Support article for Lexmark E360
Locating and clearing paper jams
Overview
When a paper jam occurs, a Paper Jam message appears on the printer screen, accompanied by a three-digit prefix number. The number indicates the location of the jammed sheet of paper. This article helps you to locate and clear paper jams based on the jam number displayed.
Locating the paper jam
The following illustration shows the path along which paper travels through the printer. The path varies depending on the input source (tray or feeder), the output destination, and whether a duplex (two-sided) print job is being sent. The paper jam numbers are given to show where each jam can be located.
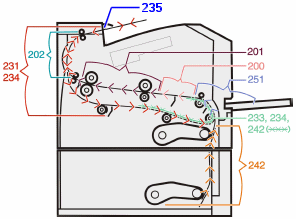
Accessing paper jams based on the jam number
See the table for a list of jam numbers and instructions on how to access each jam.
| Jam number | How to access the jam |
|---|---|
200 | Try one or more of the following:
|
201 | Open the front door, and then remove the photoconductor kit and toner cartridge (toner unit). |
202 | Open the front door, and then open the rear door. |
231 | Open the front door, and then open the rear door. Note: For alternative access to the jam, remove Tray 1, and then depress the lever. |
233 | Remove Tray 1, and then depress the lever. Note: For alternative access to the jam, open the front door, and then open the rear door. |
234 | Try one or more of the following:
|
235 | Remove the jam from the standard exit bin. |
242 | Remove Tray 2. |
251 | Try one or more of the following:
|
If the issue persists, search for more information related to this issue or contact support for further assistance.
LEGACY ID: HO3430
Rate this article
We appreciate your feedback. We use it to identify content which needs to be updated for accuracy or usefulness.
Thank you for your feedback!