Creating a booklet using the print driver
Learn how to make booklet jobs using the print driver.
For more information on the finisher configurations for booklet jobs, see Finisher configurations and supported finishing jobs.
Before creating a booklet, make sure that:
- The paper is loaded with the short edge toward the right side of the tray.
- The paper size or paper type is supported by the finisher configuration. For more information, see Paper sizes supported for fold jobs or Supported paper types.
If you want to add a cover page, then make sure that:
- The paper for the cover page and the interior pages are loaded in different trays.
- The correct paper type is set for each tray.
For Windows users
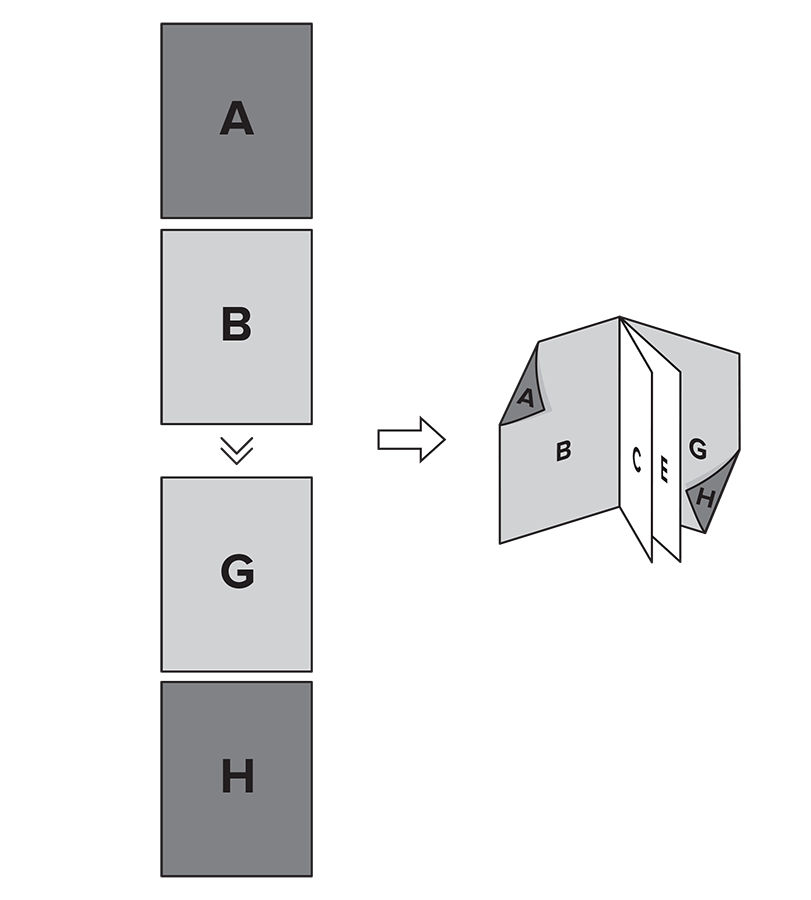
Creating a booklet format
- Access the print driver. For more information, see Accessing the print driver.
- In thePage Orientationmenu, selectPortrait.
- In thePage Layoutsmenu, selectBooklet.
- To add a cover page, clickEdit Settings, and then configure the following:
- Create a booklet cover
- Paper source/tray
- ClickPaper/Finishing, and then configure the following:
- Paper Size—The dimensions of the paper for printing the pages.
- Paper source/tray—The input device that holds paper for printing the pages.
- Fold
- V-Fold Multiple—All pages folded into one booklet without a staple.
- V-Fold Multiple and Center Staple—All pages folded and stapled into one booklet.
- V-Fold—Each page folded into separate booklets without a staple.
- If printing using Adobe Acrobat, to prevent the booklet from being printed inside out, click .
- To print the document, do either of the following:
- For documents made in Adobe Acrobat, Word, or PowerPoint, clickOK, and then clickPrint.
- For documents made in a web browser, click .
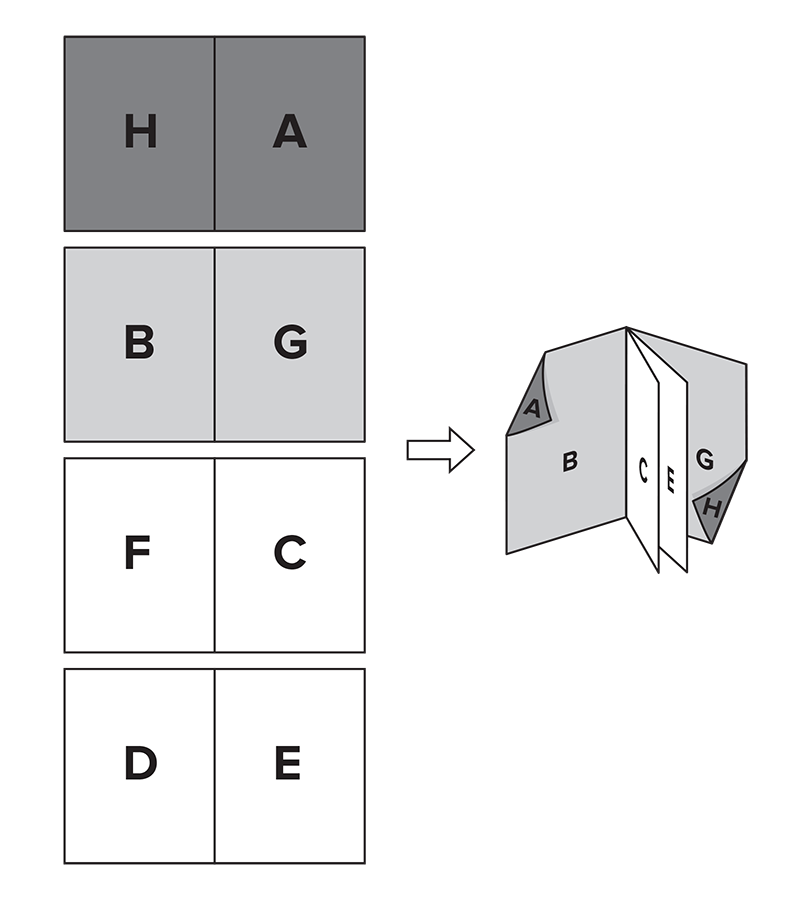
Creating a booklet spread
- Access the print driver. For more information, see Accessing the print driver.
- In theCopiesmenu, selectReverse page order.
- In thePrint on Both Sides (Duplex)menu, selectPrint on Both Sides, and then selectShort edge.
- In thePage Layoutsmenu, selectNormal.
- ClickPaper/Finishing, and then configure the following:
- Paper Size—The dimensions of the paper for printing the pages.
- Paper source/tray—The input device that holds paper for printing the pages.
- Fold
- V-Fold Multiple—All pages folded into one booklet without a staple.
- V-Fold Multiple and Center Staple—All pages folded and stapled into one booklet.
- V-Fold—Each page folded into separate booklets without a staple.
- To add a cover page, do the following:
- SelectUse multiple input options, and then clickEdit Settings.
- Double-clickFirst pageorLast page, and then selectUse different paper tray and type.To use both, double-click the unselected option, and then selectUse different paper tray and type.
- Configure the following:
- Paper source/tray
- Paper type
- ClickOK.
- If printing using Adobe Acrobat, to prevent the booklet from being printed inside out, click .
- To print the document, do either of the following:
- For documents made in Adobe Acrobat, Word, or PowerPoint, clickOK, and then clickPrint.
- For documents made in a web browser, click .
For Macintosh users
- The booklet format is not supported in Macintosh.
- Adding a separate cover page is not supported in Macintosh.
Creating a booklet spread
- Access the print driver. For more information, see Accessing the print driver.
- In the dialog that appears, select a printer.
- In theDouble-sidedmenu, chooseOn (Short Edge).
- If printing using Adobe Acrobat, do the following:
- Choose the size of your document.
- ClickPaper Handling, and then choose .
- ClickPrinter Options, choose , and then choose any of the following:
- Fold and Staple
- Fold
- Fold Each Sheet Individually
- If printing using an application other than Adobe Acrobat, clickOK, and then clickPrint.If printing using an Adobe Acrobat, do the following:
- ClickOK, and then clickPrintto return to the Adobe print dialog.
- In thePages to Printmenu, clickMore Options, and then chooseReverse pages.
- ClickPage Setupand then choose the size of your document.
- ClickOK, and then clickPrint.