201 paper jam error
A "201" Type Paper Jam Error Is Appearing on a Lexmark X642, X644, or X646 Series Printer
What you will see
When a sheet of paper or other print media jams in the printer, the printer will stop printing and a jam message will be displayed in the status bar located at the bottom of the touch screen. A
201
or 201.xx
type Paper Jam
message indicates that a sheet of paper is jammed inside the printer, under the toner cartridge.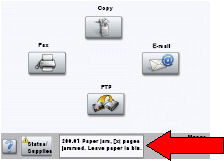
Removing the jammed paper
To resolve the paper jam message, you must clear the entire paper path and then touch
Continue
to clear the message and resume printing.Step | Action | Image |
|---|---|---|
1 | To access the jam area, push the outer release latch and lower the multipurpose feeder. Then push the inner release latch and open the top front cover. | 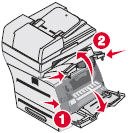 |
2 | Lift and then pull the print cartridge out of the printer. IMPORTANT! Try not to touch the photoconductor drum on the underside of the cartridge. Use the cartridge handle whenever you are holding the cartridge. | 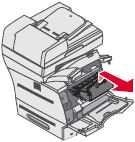 |
3 | Place the print cartridge aside. It is recommended to place the cartridge on a sheet of paper so that it can catch any loose toner. IMPORTANT! Do not expose the toner cartridge to direct sunlight. Do not leave the cartridge exposed to any light, even regular room lighting, for an extended period of time. | |
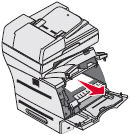
4 | Locate the jammed sheet of paper. Pull it up and towards you.If the print media does not move immediately when you pull, stop pulling. Access the jammed page from the rear of the printer. See the next step below. NOTE: If you are able to remove the page, skip ahead to step 6 . CAUTION:
|  |
5 | If you can see the jammed sheet of paper but it does not want to move easily, open the rear door of the printer. See if you can remove the jammed sheet from the back. Again, use caution when removing the jammed sheet of paper as the fuser unit located at the rear of the printer may be hot. |  |
6 | Once you have removed the jammed page, make sure the entire paper path is clear. If this print job consisted of multiple pages, there may be other pages jammed elsewhere in the printer. Open all cover s and remove all paper trays. Confirm that there are no other pages jammed. | |
7 | Once you have confirmed that the paper path is clear, reinstall the toner cartridge. | |
8 | Reinstall any paper trays you removed while checking the paper path. | |
9 | Close all of the doors/covers on the printer that you needed to open. | |
10 | Touch Continue . The printer will attempt to print the jammed page again, along with the remaining portion of the print job.NOTE: If the Jam Recovery setting is set to On or Auto , the printer will attempt to print another copy of the page that jammed. The default for this setting is Auto . |
If paper continues to jam
If the printer continues to jam paper, try the following suggestions:
- If thepaper is getting damagedinside the printer, do the following:
- Look for some obstruction in the vicinity of the leading edge of the paper that might be preventing the paper from feeding through.
- If no obstruction is found, open the rear door.
- Turn the printer off and on.
- During the power-up sequence, watch the rollers at the back of the printer (where the paper comes out onto the top of the printer) to see if they are turning. If they are not turning, the fuser assembly inside is not turning and that is causing the paper to jam as it tries to go through. Correcting this will require a service action. Please contact Lexmark Technical Support or a local authorized service provider to arrange service on t he printer. See 'Contacting Lexmark' below for details.
- If the jammed sheet of paper isnot damaged, do the following:
- If you are printing on narrow media, the printer may be experiencing a problem reading the correct media size.NOTE:"Narrow media" is defined as paper or other print media having a width less than170 mm(6.7 inches). Due to the jam detection method the printer uses, narrow media can stop feeding through the printer and cause a201type paper jam message to appear.
- If you are printing on both sides of the page, try printing on just one side. If this corrects the issue, there may be a problem with the duplex unit.NOTE:Do not manually re-feed printed pages through the printer, i.e. print on one side of the page and then reload the paper back into the tray to print on the other side. This is not recommended and can cause jamming issues.
- If you are printing on one side of the page and the jamming continues, the printer may need service. Please contact Lexmark Technical Support or a local authorized service provider. See 'Contacting Lexmark' below for more information
- Are you printing on regular plain bond copy paper? If not, try printing again with plain copy paper. This will eliminate special media as the cause, even if the special media has worked in the past.
NOTE:
Certain specialty papers, letterhead stock, label stock, and card stock are more diffi cult to feed and are more likely to jam. For more information, refer to the Card Stock and Label GuideIf you go through all of the above checks and the printer continues to jam or if you cannot find any paper jammed in it, the printer may require service. Please contact Lexmark Technical Support or a local service provider.
If none of the above suggestions resolves the issue, please contact Lexmark Technical Support or a local authorized service provider for additional assistance.
If you call Lexmark Technical Support for assistance with your printer, be prepared to describe the problem you are experiencing and any troubleshooting steps you have already taken. This information can be found on a label located on the inside of the printer, under the front cover.Please call from near the printer in case the technician asks you to perform a task involving the printer.
LEGACY ID:
SO4253
Audience:
Check the Maintenance Count before setting up service
The left-most digit (.
x
) of the 201.xx
error code indicates the page count of the fuser unit.- 201.0x: the fuser page count is between 0 and 99,999 pages.
- 201.1x: the fuser page count is between 100,000 and 199,999 pages.
- 201.2x: the fuser page count is between 200,000 and 299,999 pages. 201.1x: the fuser page count is between 100,000 and 199,999 pages.
- 201.3x: the fuser page count is between 300,000 and 399,999 pages.
- 201.4x: the fuser page count is between 400,000 and 499,999 pages.
- 201.5x: the fuser page count is between more than 500,000 pages.
- 2019x: the fuser page count is not available.
Technicians:
If you receive a call on a printer displaying an error code ending in .3x
, .4x
, or .5x
, inform the customer that they must purchase the fuser unit or the maintenance kit BEFORE
we will set up warranty service on the printer. Ask the customer if they are also receiving an 80 Scheduled Maintenance
error. If so, inform the customer that it would be better to order and replace the entire maintenance kit
.Service Check: 201.xx paper jams
Below is a table detailing each of the possible
201.xx
error codes based on the second
.x x
digit. This table lists the p ossible root causes of the error and things you can do on the phone to diagnose or fix the problem.Checking the input and exit sensors
If the jammed sheet of paper is not damaged when it jams, one of the sensors may not be working. Look to see if the paper has made it into and partially out of the fuser unit (the hot rollers located near the back of the printer). If this is occurring, the exit sensor on the fuser unit may not be working, allowing the paper to get into the fuser but never sensing that it made it to that point. This will probably require that the exit sensor assembly be replaced.
NOTE:
Replacing the entire fuser assembly will also take care of this issue. You can walk a customer or a technician through checking the conditions of the sensor flags on the fuser unit. To do this:- Power off the printer.
- Open the rear door of the printer. You should be able to see the sensor by looking near the middle of the opening. You will be able to see the orange roller of the fuser farther back in side the printer. A little right of center, you can also see a shaft of black plastic that points up across the opening.
- Take a pen or pencil to move this shaft up and away from you. It should swing freely back down when you remove your pen or pencil. This shaft is part of the paper exit sensor flag. The actual flag that the paper hits as it exits the printer is a little harder to see. It is sticking up an inch or two to the right. Use the pen to move the flag towards the back of the printer. The flag should now be lying flat, as it would when a piece of paper is passing over it.
- When you take the pen away, the flag should pop back up. Make sure that the flag moves freely and that it appears to be snapped in properly.
- Look for any paper or debris in this area, too. If there is something wrong with the flag or sensor, the fuser unit will likely need to be replaced.
You can also check the input sensor flag. To do this:
- Power off the printer.
- Look for two white rollers and underneath them, two white gears. They are located at the left side of the inside of the printer, beneath where the cartridge sits.
- Just back and to the right of the rear roller and gear, you should see a black plastic flag sticking up through a hole in the black plastic floor of the printer. This is the input sensor flag. Click here for a picture.
- Using a pen or pencil, carefully push the flag towards the back of the printer. It should point to the rear of the printer and lie down.
- When you remove the pen or pencil, the flag should pop back up freely.
- If it does not, see if you can find out why. There may be a piece of paper or a broken printer part in the way, or the flag may have come loose.
LEGACY ID:
SO4253