How to Set Up ODBC Access for the Lexmark Markvision Enterprise Database
How to Set Up ODBC Access for the Lexmark Markvision Enterprise Database
Overview:
This document provides step-by-step instructions on how to use Open Database Connectivity (
ODBC
) to extract data from the built-in Firebird database that is included with Lexmark Markvision Enterprise (MVE
).
Procedure:
Please note that the nature of ODBC connections require a local connection. Therefore, you must either perform all the following procedures on the Markvision server (requiring you to install the application software, such as Microsoft Excel or Access, on the server) or you must install MVE on a workstation and copy the database file from the server in order for it to work.
NOTE:
Prior to running any queries, you should perform an audit in Markvision to ensure that the database contains up-to-date information.
Obtain and Install Software and Documentation:
- Obtain the freeFirebird ODBC driver, available from the Firebird web site . Make sure you obtain the proper version for your operating system (32-bit or 64-bit).
- Install theFirebird ODBC driveron the computer where you intend to access the Markvision Enterprise data.
- Download theMarkvision Enterprise Database Accesswhite paper which is available from Lexmark’s Markvision web site . Scroll down to the bottom of the page then selectDatabase White Paper.
Review the white paper to determine:
- Thetablewhich contain the data you want
- Thefieldwhich contain the data you want
Create ODBC Data Source:
- Open theODBC Data Sources tool. In most versions of Windows OS, go to:Control Panel>Administrative Tools>Data Sources(ODBC).
- Under ODBC Data Source Administrator, clickUser DSNtab.
 |
- Click onAdd.
- Click the Create New Data Source window and select theFirebird/InterBase(r) driver.
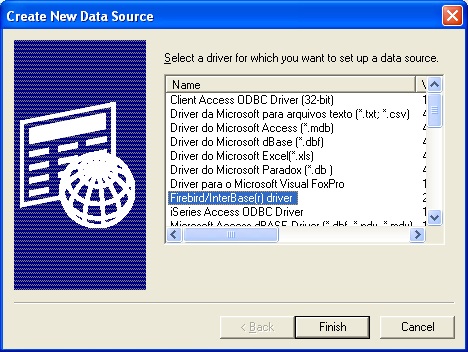 |
- Click onFinish.
- Fill the FireBird ODBC Setup dialog box with the following information:
- Data Source Name(DSN):Enter a descriptive name that you will recognize when it appears as a selection in applications, such as MVE Data.
- Description:Enter a longer description of the database if you wish, such as Lexmark Markvision Enterprise database.
- Database:Browse to C:\Program Files\Lexmark\Markvision Enterprise\firebird\data and select theFRAMEWORK.FDBfile.
- Client:Browse to C:\Program Files\Lexmark\Markvision Enterprise\firebird\bin and select theFBCLIENT.DLLfile.
- Database Account:FRAMEWORK
- Password:rivet
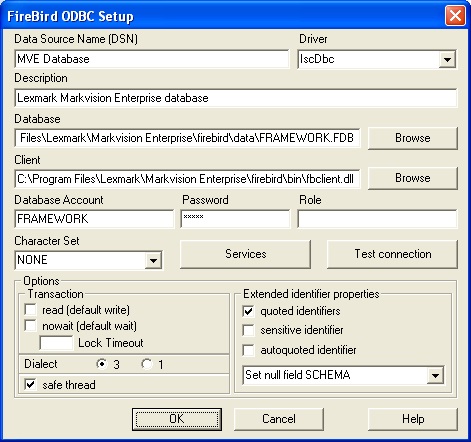 |
- Leave all other settings unchanged and clickOKtwice.
Open ODBC data source using Microsoft Excel:
NOTE:
The following instructions are based upon Microsoft Excel 2007.
- Open Microsoft Excel then click on theDataribbon.
- ClickFrom Other Sources.
- SelectFrom Microsoft Query.
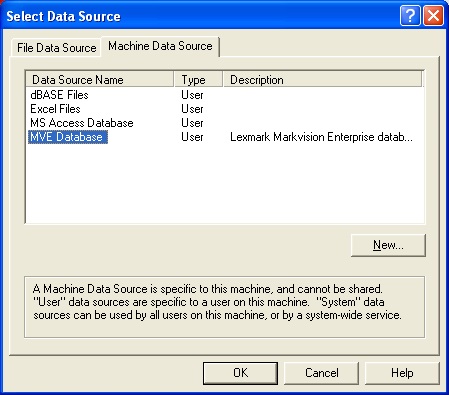
- In theChoose Data Sourcedialog box, select the data source you created from Step 3.
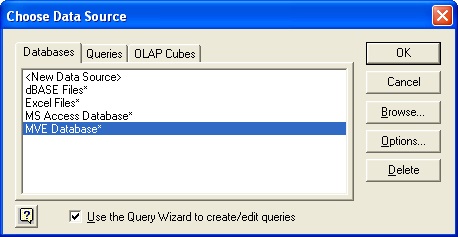 |
- ClickOK.
- Under the Query Wizard, locate the tables and select the fields you want to include in your query output. Choose a field and click on the>button to add it to the query results.
For example:
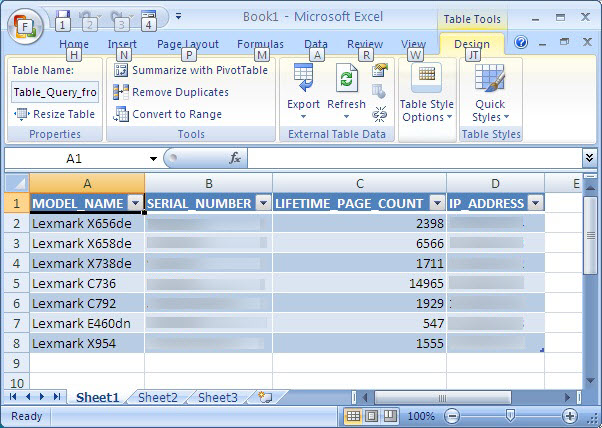
- NETWORK_PRINTER table; SelectMODEL_NAME, SERIAL_NUMBER, andLIFETIME_PAGE_COUNT.
- NETWORK_ADAPTER table; Select theIP_ADDRESS field.
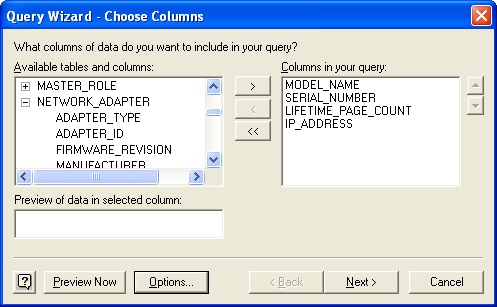 |
- ClickNext.
- Enter filters to obtain more specific results, and then clickNext.
- Specify how the data should be sorted, then clickNextagain.
- ClickFinish, thenOK.
- Save the file so that data can modified, formulas can be added, and so on.
 |
Open ODBC data source using Microsoft Access:
NOTE:
The following instructions are based upon Microsoft Access 2007.
- Open Microsoft Access and create a new blank database.
- Click theExternal Dataribbon.
- Click theMorebutton and selectODBC Database.
- The best option is toLink to the data source by creating a linked tableas this means the data will continue to be dynamic; when you perform a discovery or an audit in Markvision, the changes to the database will be reflected in Access.
- ClickOK.
- In theSelect Data Sourcedialog box, click on theMachine Data Sourcetab.
- Select the ODBC connection you created earlier and click onOK.
 |
- Select the tables you wish to include in the Access database (refer to the database white paper to determine which tables contain the data you need). Use Ctrl+click to select more than one table. Click onOK.
- Click on theCreateribbon.
- Click on theQuery Designbutton.
- In theShow Tabledialog box, select the tables you wish to query and click onAdd.
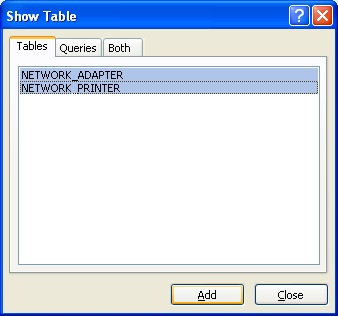 |
- Click onClose.
- Drag the fields you wish to include from each table into successive columns below.
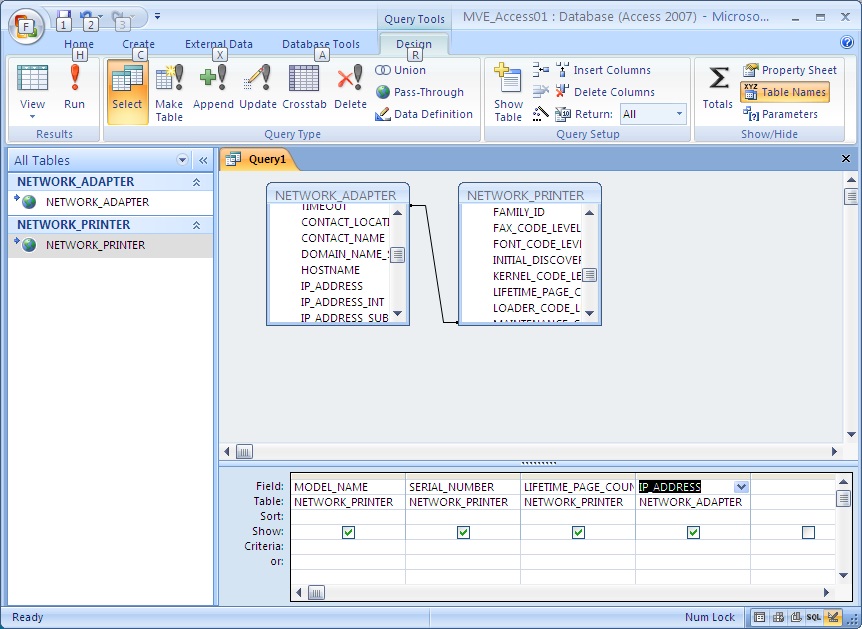 |
- Or optionally, a criteria can be added in the appropriate column to filter data.
- Click theRunbutton to run the query and see the resulting data.
- Click onViewand selectDesign Viewto return to the design window and modify the query. ClickRunagain to see the results.
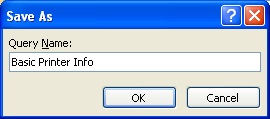
- Once you are satisfied with the results, click theSavebutton in the office toolbar. When prompted, give your query a descriptive name.
 |
- The access has report tools available on theCreateribbon if you wish to create reports from your data.
Still Need Help?
Have the following available when calling Lexmark Technical Support;
- Printer model(s)
- Printer serial number
- Name and version of the solution
LEGACY ID:
HO4079