The Control panel goes Black and does not respond or Light up
  1. guides
  2. en
  3. Knowledge base
  4. Scan and copy issues
  5. Scan and copy quality issues
  6. The Control panel goes Black and does not respond or Light up

The Control panel goes Black and does not respond or Light up

The Display Panel of a Lexmark X792 MFP Goes Black and Does Not Respond or Light Up

Issue description

The
Front Panel LCD
screen suddenly goes blank and unresponsive, as seen in the image below.
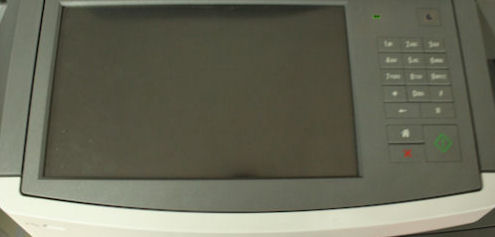
Solution

Step
Action
1
Lightly touch the display panel and see whether it lights up. If the screen responds, it may just be in 'sleep' mode. Otherwise, proceed with the next step.
2
Power off the printer and allow it to sit powered off for ten to 20 seconds.
3
After ten seconds or more, power on the printer again. See if the display panel powers on correctly.
Important!
Do not power the printer off and on too quickly. Doing so can cause a power issue with the display panel and create this issue.
  • If the display panel powers on correctly, but the printer still exhibits the same behavior after some time has passed, the
    Universal Integrated Circuit Card
    (
    UICC
    ) code on the device may need to be updated. See the section How to Check and Update the UICC Code below.
  • If the display is readable, but simply too dark to read easily, you may be able to correct the issue by increasing the
    Screen Brightness
    setting. See the section How to adjust the LCD Brightness setting below.
  • If the display does not does light up at all, there may be a failure with the power supply. See the section How to Check for Failure of the Power Supply below for instruction.

How to Check and Update the UICC Code

Step
Action
1
Check the current
UICC
code level of the machine using either of the methods below:
  • Printing the
    Menu Settings Page
    1. Press the Menu button button on the Printer’s Operator Panel.
    2. Press the scroll left button next to
      Reports
      .
    3. Press the scroll left buttonnext to
      Menu Settings Page
      to start printing
    4. Look for the
      UICC code level
      under
      Device Information
      . Click here to see sample.
  • Using the Printer’s Embedded Web Server (
    EWS
    )
    1. Launch Internet Explorer (or any other Internet browser).
    2. Enter the printer's
      IP address
      into your browser's address field.
    3. Click on
      Reports
      .
    4. Click on
      Device Information
      .
  • If the printer’s
    UICC
    code is
    v5.53
    below, proceed with
    Step 2
    .
  • If the printer’s
    UICC
    code is already
    v5.53
    or above, contact Lexmark Technical Support for other troubleshooting steps.
2
Download the latest code from Lexmark Support website. Type
X792
as your
Authorization Keycode
and press enter. Save the file and extract it on the same directory.
3
Update the printer firmware. Please refer to Firmware Update Instructions for steps in updating the printer firmware.

How to adjust the LCD Brightness setting

If the display is readable but very dim, it is possible that the screen brightness has been set too low. To check this setting, perform the following:
Step
Action
1
At the
Ready
screen, press the Menu button button in the lower right-hand corner of the touch screen. A series of menu choices should display.
2
Press the scroll left button next to
Settings
. A new set of menu choices should appear.
3
Press the scroll left button next to
General Settings
. Another set of menu choices should appear.
4
Look for
Screen Brightness
. If
Screen Brightness
is not showing, press the scroll down button until you see the
Screen Brightness
setting.
5
The current value for Screen Brightness will be displayed. The number should be somewhere between
20
and
100
.
  • If the number is less than 100, press the scroll right button and increase this number to
    100
    . Press the
    Submit
    button in the lower left-hand corner to save the new value. If this corrects the issue, press the home button button to return to the
    Ready
    screen and continue using the printer as normal.
  • If the Screen Brightness setting is already at 100, or if increasing the Screen Brightness setting has no effect, you can try resetting the printer back to its factory defaults as a last resort. This will reset all user settings on the printer. To do this:
    1. At the
      Ready
      screen, press the Menu button.
    2. Press the scroll right button next to Settings.
    3. Press the scroll right button next to General Settings.
    4. Look for
      Factory Defaults
      . If Factory Defaults is not showing, press the scroll down button until you see
      Factory Defaults
      .
    5. 'Do not Restore'
      should now display. Press the scroll right button once and change this to
      'Restore Now'
      . Press the
      Submit
      button in the lower left-hand corner. The printer will reset all user settings back to their factory default values.
      If the display panel remains dark after this, please contact Lexmark Technical Support for further assistance.
  • If none of the options resolve this issue, the printer may require a service action. For additional assistance, please contact Lexmark Technical Support.

How to Check for Failure of the Power Supply

Step
Action
1
Power off the printer. Wait ten to 20 seconds, then power it on again. The motors within the printer should turn within the first minute after the printer is powered on. If this occurs, the power supply is working.
If the printer is getting power, but the touch screen display still fails to light up, the likely cause is display panel failure or failure of one of its connecting cables. This requires a service action to correct. Please contact Lexmark Technical Support or a local authorized service center.
2
If the printer remains silent, look for any LED lights that are on.
  • If the printer is connected to a network, you can check to see if the network communication light is on. To do this, go around to the back of the printer. Look where the network cable connects into the printer.
  • If you see the network communication light is lit, or any other lights on the printer are lit, the power supply is working.
  • If the power supply is working, but the touch screen display still fails to light up, the likely cause is display panel failure or failure of one of its connecting cables. This will require a service action to correct. Please contact Lexmark Technical Support or a local authorized service center.
3
If no lights on the printer are lit and the printer makes no noises at all on power up, verify the power source.
  • If the printer is connected into a power strip, try plugging the printer straight into a wall outlet.
  • If the printer is plugged into a wall outlet, test the outlet by plugging another device, such as a lamp, into the outlet or plug the printer into another location.
4
If you confirm that the power source is good, the power supply on the printer may be failing. This will require a service action to correct. For additional assistance, please contact Lexmark Technical Support or a local authorized service center.
LEGACY ID:
TE334