Skewed image when using the ADF or flatbed scanner
Print Is Slightly Crooked/Skewed When Using the ADF or Flatbed Scanner on a Lexmark X65x Series Printer
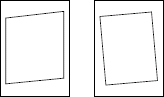
What you will see
When you use the Automatic Document Feed (ADF) scanner or the flatbed scanner, the resulting scanned or printed text is slightly crooked on the page. The print can drift up or down the page as you read it from left to right or the print can appear shifted on the page. See the two images below for exaggerated examples.
Recommended actions
Check the following:
- If you are using the ADF scanner:
- - Check to ensure that the paper/print media is properly loaded.
- - Make sure the edges of the paper stack are even when loading it into the ADF input tray.
- - Confirm that the paper support guides are set in the correct position. The support guides should lightly rest against the paper stack, thereby preventing the stack from shifting left to right while not binding the paper.
- - Do not load different sizes or types of paper at the same time.
- - Make certain not to overload the ADF input tray.
- - Check and clean the paper feed roller and the separator pad on the ADF.NOTE:If either of these parts appear worn, they will need to be replaced.NOTE:For more detailed paper loading instructions, refer to the printer'sUser's Guide.
- If the issue continues after attempting all of the above recommendations, try using the flatbed scanner. When using it, make sure you properly align the page with the upper-left corner of the scanner glass and fully against the edges.NOTE:If using the flatbed scanner results in a noticeable improvement, the printer may require a service action to the ADF feed mechanism in order to correct this issue. Please contact Lexmark Technical Support for additional assistance, (click here for contact information). If the skew from the ADF scanner is severe, you can continue to use the flatbed scanner until a service call is arranged.
- If the skew issue continues when using the flatbed scanner, try printing aNetwork Setuppage. To do this:
- At theReadyscreen, press theMenusbutton located in the lower right-hand corner.
- A list of menu choices will display. SelectReports. Another list of menus will then appear. SelectNetwork Setup Page.
- The printer will print out one to three pages, depending on how many network options it has installed. Each of these pages has a border on them that will help you to see if they exhibit the same skewing issue.
- •If any of the borders on the Network Setup pages appear skewed as well, then an issue exists with a part on the base printer. Crooked or skewed print check to view further suggestions on how to correct the issue.
- •If all four borders on the Network Setup pages are parallel with the edges of the page, one of the scanner units may require a service action to correct the issue.
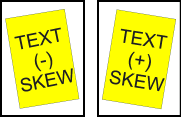
Negative ('-') Skew | Positive ('+') Skew |
|---|---|
 To view a larger image, click here. |  To view a larger image, click here. |
- If the skew is seen when usingboththe ADF and the flatbed scanners, or if the issue is seen only when using theflatbedscanner, replace thescanner unit assembly. Recommend the appropriate part number below.
- - For X651, X652, X654, and X656 models, use part number40X2165.
- - For X658 models, use part number40X2166.
- If the issue is seen when using the ADF scanner, replace theADF unit assembly. Recommend the appropriate part number.
- - For X651 and X652 models, use part number40X2738.
- - For X654, X656, and X658 models, use part number40X2745.
NOTE:
If the issue is seen only
when scanning both the front and back sides of the pages, replace the ADF duplex CCD assembly
instead, (part number: 40X4547
).IMPORTANT!
After replacing any of the parts listed above, make sure to test the registration of the printer to see if the new part requires any adjustments. If the part numbers above do not work, please contact Lexmark Technical Support to get the current part numbers.
If replacing the parts listed above does not correct the issue, please contact Lexmark Technical Support or your next level of support before arranging additional service.
LEGACY ID:
SO4889