The Print on the Page Appears Crooked or Skewed
The Print on the Page Appears Crooked or Skewed on a Lexmark T650, T652, or T654 Printer
Issue description
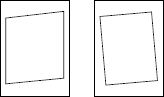
You notice that the print on the page is slightly crooked or skewed. It can shift as it goes from left to right or the entire text and/or image can be crooked on the page. See the two images below for exaggerated examples.
Possible causes
There are a few possible causes for this issue.
- The side restraints inside the paper tray are not set correctly, thus allowing the paper to shift and feed in at a slight angle as it moves out of the tray.
- If you are using a special media such as card stock, labels, or envelopes, it may be slipping slightly on the rollers as it feeds through the printer.
- There may be a build-up of paper dust or toner dust on one or more of the feed rollers.
- There may be a damaged or worn set of feed rollers in the printer.This will require that the feed rollers be replaced and will probably result in the printer requiring service.
- A part within the printer is out of alignment.This will require a service action on the printer.
Solution
Step | Action |
|---|---|
1 | Reload the stack of paper into the tray. Make sure the side guides in the tray are set correctly.
|
2 | If the print and/or text continues to skew, try opening a new ream of paper and loading it into the tray. Try printing on plain copy paper, if you are not already doing so. Please try this even if the print media you are currently using has worked in the past. Do this to eliminate any special print media as part of the cause of the problem. Certain specialty papers, letterhead stock, label stock, and card stock are harder for the printer to feed and increase the chances of the pages feeding through crooked, and thus skewing the print. |
3 | If the skewed print continues, power off t he printer. Open the lower and upper front covers and remove the toner cartridge. Check the inside of the printer. Examine the rollers as best you can and remove any small pieces of paper you find. Also, try cleaning out the inside of the printer with a dry cloth to remove any loose dust produced by either the paper or toner. Look for any damaged or worn rollers. If you find any, those rollers will need to be replaced. Please contact Lexmark Technical Support or a local service provider. See ' Contacting Lexmark ' below for details |
4 | If you are printing on both sides of the page (duplexing), try printing on only one side of the page. IMPORTANT! Make sure you are utilizing the duplex feature when printing on both sides o f the page. Printing on one side, then re-feeding printed pages through the printer (also known as manual duplexing) can cause paper feed issues to occur.
|

Recommended actions
Paper Feed Skew | Paper Feed skew, or Feed skew, is the most common type of skew. The identifiable characteristic of feed skew is the fact that the left and right margins are not parallel with the left and right-hand edges of the page. |  |
Printhead Skew | The identifiable characteristic of printhead skew is the fact that the left and right margins are parallel with the left and right hand edges of the page; however, the top or bottom margins are not parallel. |   |
Service action
The Two Types of Skew
There are two types of skew that can occur on the base printer:
Paper Feed
skew and Printhead
skew. IMPORTANT!
It is possible for the printer to have both these issues at the same time.The best way to see the skew is to print a page with a border around it. Enter the printer's menus and print a
Network Setup
page. Compare the border on that p age with the examples below.Correcting Paper Feed skew
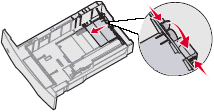
- Check the paper guide in the paper tray. Confirm that the guide on the back and right-hand sides are lightly touching the paper stack, thereby holding the stack in place straight while not binding or bending the paper. This is the most common cause for this issue.
- Check the paper pick rollers for each tray. Clean off the rollers with a dry cloth and try printing again. If cleaning the feed rollers does not correct the issue, see if the feed rollers are worn or dirty. If they are, replace the rollers. The part number for a pair of pick rollers is40X4308.
- Adjust the paper feed alignment assembly. To do this, you will need both a 7mm nut driver and a 5.5 mm open-end wrench. The 7mm driver is inserted through an access hole in the system card, and the 5.5mm wrench is placed around the nut in the slot to the left of the paper feed alignment assembly. Click here for an image. For the full details on how to perform this procedure, see the printer'sService Manual.
- If the issue continues after checking all of the above items, replace the pick rollers (PN40X4308) for each of the installed paper trays. If replacement of the pick rollers does not correct the issue, please contact Lexmark Technical Support or your next level of support before arranging any additional service.
Correcting Printhead skew
For the full details on how to perform any procedure listed in the table below, please see the pri nter's
Service Manual
.Step | Action |
|---|---|
1 | Power off the printer. |
2 | Enter the printer's Diagnostic mode. To do so:
|
3 | Enter the Registration menu and sele ct Quick Test . The printer should print out an alignment page. Save this page to use as a guide. |
4 | Power off the printer and disconnect the power cord. |
5 | Remove the laser (top) cover.
|
6 | Loosen the three screws holding the printhead unit in place. Rotate the printhead slightly and secure the printhead into place again.
|
7 | Reinstall the laser cover. |
8 | With the laser cover installed and the operator panel reconnected, you can power on the printer and print another Quick Test page to see if the printhead is now properly aligned. Do not install the remaining covers until after you have confirmed that the printhead is properly aligned. IMPORTANT NOTES!
|
9 | Once you have the skew fixed or within tolerance, reinstall the remaining covers. Once the printer has been reassembled, print one more additional Quick Test page to confirm the issue is corrected.NOTE: If adjusting the printhead unit does not correct the issue, please contact Lexmark Technical S upport or your next level of support. There are no parts that can be replaced to fix printhead skew. |
If only the trailing edge is skewed
The only way to correct this type of issue is to adjust the paper feed alignment assembly
to create a small amount of skew along the left and right hand sides to offset the printhead skew at the bottom.IMPORTANT!
This will cause the top margin to become skewed as well.The objective here is to get the overall skew, or the desired position of the print, to 1mm or as close as possible. This is within the printer's specifications. Use the directions in the table above to get the top border parallel with the edge of the page. Once the top border is set correctly, adjust the paper feed alignment assembly. Again, the objective is to get the overall skew, or the desired position of the pr int, to 1mm or as close as possible. To adjust the paper feed alignment assembly, you will need both a 7mm nut driver and a 5.5 mm open-end wrench. The 7mm driver is inserted through an access hole in the system card, and the 5.5 mm wrench is placed around the nut in the slot to the left of the paper feed alignment assembly. Click here for an image. For the full details on how to perform this procedure, see the printer's Service Manual
. If adjusting the printhead unit and the paper feed alignment assembly does not correct the issue, please contact Lexmark Technical Support or your next level of support.There are no parts that can be replaced to correct this issue.
LEGACY ID:
SO4884