Defective Cartridge error
A 'Defective Cartridge' Message Is Displayed on a Lexmark T65x or X65x Model Printer
What you will see
The printer stops printing and displays a '
Defective
Cartridge
' message. A 31.xx
numeric error (where 'x
' can be any
number) normally accompanies this message; i.e., 31.01, 31.02, 31.05,
etc.Cleaning the cartridge contacts
First try cleaning the contacts on the toner cartridge. Dust
on the contacts from either toner or paper can cause a poor connection
with the printer and result in a
Defective Cartridge
error. Follow the steps below.Step | Action | Image |
1 | Power off the printer. | No image. |
2 | Open the upper front cover. |  |
3 | Remove the toner cartridge. |  |
4 | Look for a small, green circuit board on the left-hand side
of the cartridge. Check it for any damage. If damaged, the toner cartridge
likely will need to be replaced. | 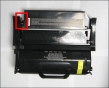 Click here to view a larger picture. |
5 | If the board is undamaged, locate the contact plates on the
board. They should look like two or four gold squares. Use a lint-free,
dry cloth to carefully clean off the contacts. | 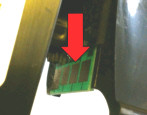 Click here to view a larger picture. |
6 | Once the contacts are clean, reinsert the toner cartridge. | No image. |
7 | Close the upper front cover and power on the printer. Does the Defective Cartridge message appear?
|
If the error message continues
- - Check the set of contacts inside the printer (click here for picture). Confirm that there are no small pieces of paper or other obstructions here. Remove any obstructions that you find.
- - Confirm that you are using an original Lexmark brand toner cartridge. A third-party cartridge may not be compatible with the printer. If a third-party cartridge is installed, try an original Lexmark cartridge.NOTE:If this corrects the issue, you will need to contact the point of purchase for questions about, or replacement of, the cartridge
- - Confirm that this toner cartridge has not been refilled or reworked. If it has, try an original Lexmark cartridge. A refilled toner cartridge can trigger this error. If replacement corrects the issue, contact the place where the other cartridge was refilled to have it replaced.
- - If the error began as soon as the toner cartridge was installed, or shortly after, then the cartridge may be broken. Follow the steps below to check.
- Power off the printer.
- If you just installed this toner cartridge, reinstall the previous cartridge.NOTE:If that cartridge is unavailable, try installing another new toner cartridge or borrow one from another printer of the same model.
- Power on the printer again afterStep 2.
- If theDefective Cartridgeerror disappears, the problem probably lies with the toner cartridge.
- - If the problem cartridge is an original Lexmark product, first contact the point of purchase and inquire about their replacement policy.
- - If they cannot help or if the cartridge was purchased directly from Lexmark, please contact Lexmark using the same contact information you used to order the cartridge.
- - If that information is no longer available, contact Lexmark Technical Support. A representative can provide assistance. See theContacting Lexmarksection below for additional information.
Step | Action |
1 | Begin by powering off the printer. In addition, unplug the printer
from the wall outlet. |
2 | Remove the leaking toner cartridge installed and discard it. IMPORTANT! If you plan to seek
a warranty replacement for the leaking cartridge, hold onto it. The
cartridge may need to be returned to get credit for a replacement
cartridge. For information on how to seek a warranty replacement of
a toner cartridge, contact Lexmark Technical Support. Be aware that
third-party toner cartridges and Lexmark brand cartridges refilled
by another company are not covered by Lexmark's warranty and will
not be replaced. |
3 | Using a dry, lint-free cloth, clean out as much of the loose
toner as possible. IMPORTANT! If possible, remove
the transfer roller and clean it. In addition, check the housing underneath
the transfer roller. Toner can accumulate in this area. |
4 | Next, try cleaning the cartridge ID contacts inside the printer.
The contacts are located along the left-hand side of the printer,
in the area where the toner cartridge is installed. Click here to view picture. The best way to clean the contacts would be with a dry cloth,
a wet wipe with isopropyl alcohol, or a cotton swap with isopropyl
alcohol on it. NOTE: If you use a cotton
swab, use caution not to leave any loose cotton strings stuck on the
contacts or the contact board. |
5 | If you have access to a small toner vacuum, try to vacuum as
much of the toner out as you can. If possible, remove the transfer
roller and check the area underneath for toner. IMPORTANT! Use a vacuum equipped
with a HEPA or similar type of filter to prevent any airborne contamination. |
6 | Once you have removed as much of the toner as you can, reinstall
the transfer roller (if you removed it). Install a different/new toner
cartridge. |
7 | Plug the printer in the wall outlet, and then power it back
on. Confirm that the printer powers up to the 'ready' status. |
8 | Try printing again. If the printer works correctly and the quality
of the print is good, continue using the printer. Pay close attention
to the printer over the next few days to see if any issues occur. If the Defective Cartridge error
returns, or if any new problems occur, please contact Lexmark Technical
Support for additional suggestions. |
LEGACY ID:
SO5247