Gmail ignores configured Reply Address in SMTP Setup or E-mail Setup
Lexmark Secure Email: Gmail Ignores Configured Reply Address in SMTP Setup or E-mail Setup
Issue description
A recent Gmail server security restriction ignores your configured
Reply Address
when initiating a Scan to E-mail
.EXAMPLES
Using test@gmail.com as a value for Reply address | Results in... | And, two identifiers reveal this issue after scanning and sending your email... |
Refer to the table below. | The Reply Address being Disregarded as an alias to the main user account; (e.g., Device User ID) gmailacctUID@gmail.com |
 |
Primary SMTP Gateway: | smtp.gmail.com |
Primary SMTP Gateway Port: | 465 or 587 |
SMTP Timeout: | 30 |
Reply Address: | test@gmail.com |
Use SSL: | Required |
SMTP Server Authentication: | Login / Plain |
Device-Initiated E-mail: | Use Device SMTP Credentials |
User-Initiated E-mail: | Use Device SMTP Credentials |
Device Userid: | gmailacctUID@gmail.com |
The Embedded Web Server location
Settings
> E-mail/FTP
> SMTP Setup
is accessed by entering your printer's IP_address into your browser's web address field; i.e., http://10.10.10.10. See here the Lexmark CX 72x, 82x, 86x Series MFPs setup.
Solution
To get Gmail to
recognize
the Reply Address
as the sender
and to recognize the Reply-to
in the header
, you will have to create an alias.To do this:
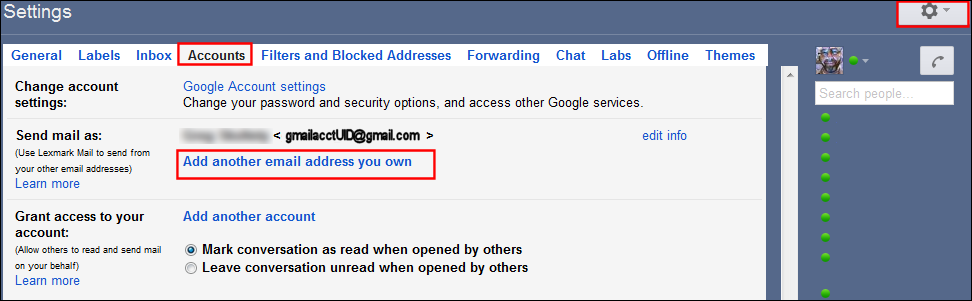
- Open Gmail.
- Click onSettings(Gear icon).
- Click onAccounts, orAccounts and Import.
- Next toSend mail as, click onAdd another email address you own.
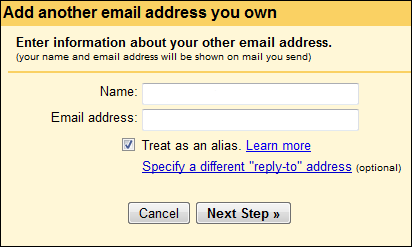
- Enter anameand thereply email addressyou want to see appear; i.e.,test@gmail.com, and clickNext Stepto complete the process.
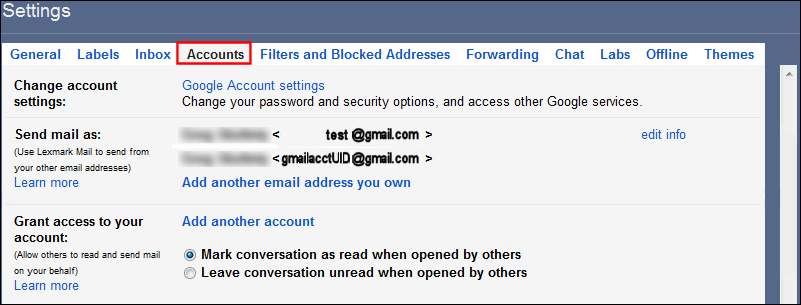
- After completion, you should see both the main and alias email address.
If the issue persists, search for more information related to this issue or contact support for further assistance.
Verifying success
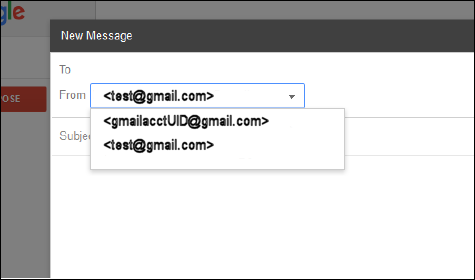
Sending an e-mail will now show the correct sender (reply-to) information in the recipient's inbox.

Logging into your account using the main-authenticating account (gmailacctUID) now allows you to send e-mails using the alternate (alias) email address.
LEGACY ID:
SO8045