Installing Lexmark print drivers in macOS
Installing your printer on a macOS ‑ Check out the following steps to get started.
Issue description
This article details the step-by-step procedures for how to install your
local
(USB
) or network
connected Lexmark printer on your Mac Operating System.Installation instructions can vary depending on the following Lexmark print driver or software sources:
- Installation CD for OS X10.5–10.7
- Lexmark Web-downloaded driver installation for OS X10.4orlater
Make sure that you select your installation path below based on printer compatibility and driver type. Click here to determine your printer's operating system compatibility. Mac OS 10.6.x and below users see
Print & Fax
, Mac OS X 10.7 and Mac OS X 10.8 users see Print & Scan
, and Mac OS X 10.9 and later users see Printers and Scanners
in the instructions below.Solution
Installation CD
These steps apply to
Mac OS X 10.5 – X 10.7
only.- Insert the installation disc into your Mac.
- Double-click the<Series>Installericon to start the installation.
- Follow the instructions that you see on your computer screen.
- The installation process ends with thePrinter Setupscreen of theLexmark Setup Assistant.
Lexmark Web Package Driver Installation
These steps apply to
Mac OS X 10.4
or later
for any web driver downloaded from the Lexmark website. For more information, click here.Using Local (USB) connection
- Remove any previously installed drivers by locating and running the Uninstaller application.Uninstaller location: FromFinder, navigate toMac HD>Application>Lexmarkand double-click onUninstaller.
- If you have not already downloaded the latest driver, go back to the Lexmark website, select your printer and OS version to obtain the correct driver. Refer to Downloading and installing the print driver to view the steps on how to download the latest driver.
- Double-click theInstallicon and follow the instructions on your computer screen.
- The installation process ends with thePrinter Setupscreen of theLexmark Setup Assistant.
Using Network (Ethernet) or Wireless Connection
Make sure that the printer is turned
ON
and Ready
and make sure that your computer is communicating on the network. If your printer is already communicating wirelessly or with an established Ethernet connection, proceed to Step 3
.- Choose a method to join your wireless network.
- For thedefault installationmethod, double-click on theInstallicon and follow the instructions on your computer screen for the network connection type being used.
- For theWi-Fi Protected Setup, activate WPS push-button method from the printer by:
- Press(Setup)> Network Setup > Wireless Networking > Wi-Fi Protected Setup > PBC
- Quickly go to the wireless router to press its WPS button and wait for configuration to complete.
- Repeat if necessary.
- For theEthernet-to-Wireless Setup, obtain the printer IP address and navigate toSettings>Network/Ports>Wirelessto configure your security settings.
- If your printer is not Bonjour-enabled, you must obtain the printer IP address; e.g., 192.168.0.125.
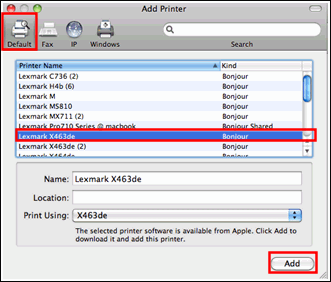
- Add the print queue.
- From theApplemenus, navigate to either of the following:System Preferences>Print & ScanorSystem Preferences>Print &Fax.
- Click the [+] sign and then theDefaultTab.
- On theDefaulttab, select (highlight) the printer from the list of discovered printers.Option:For printers that do not support Bonjour, selectIPtab, selectInternet Protocol (IPP)orHP JetDirect Socketunder theProtocol tab, and then enter the printer IP Address.
- The system automatically searches for the applicable driver.If the print driver is not found, select it manually from thePrint Usingdrop-down list. ClickOthersand search for your printer model's corresponding PPD file.
- ClickAdd.
- Verify the successful connection by going toSystem Preferences>Print and ScanorSystem Preferences>Print and Fax.If you must re-run this application:
- Navigate to theLexmark <Model> Seriesinstallation folder.
- Directory path:<HD Volume>/Library/Printers/Lexmark/2### folder; i.e., 2009
Installing drivers bundled through Apple Software Update
These steps apply to
Mac OS X 10.6
or later. For more information, click here.Using Local (USB) connection
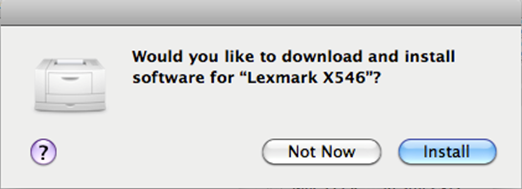
- Turn on the printer.
- Attach the printer to your computer using the USB Cable.
- If no previously installed printer is detected, a dialog displays saying, "Would you like to download and install software for <Lexmark Model >?". ClickInstall.
- Verify the successful connection by going toSystem Preferences>Print and ScanorSystem Preferences>Print and Fax.
LEGACY ID:
HO3732