Support article for Lexmark MS711
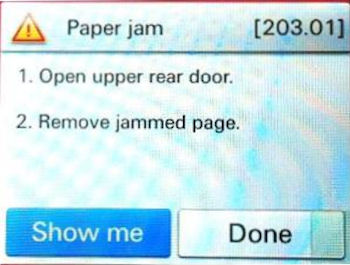
203.01 paper jam error
What you will see
The printer posts a 203.01 paper jam error. The error may be observed after printer has been asleep for hours, (such as first thing in the morning). Often, no jammed paper can be found in the paper path.
Click here to see sample image.
Suggested Remedy
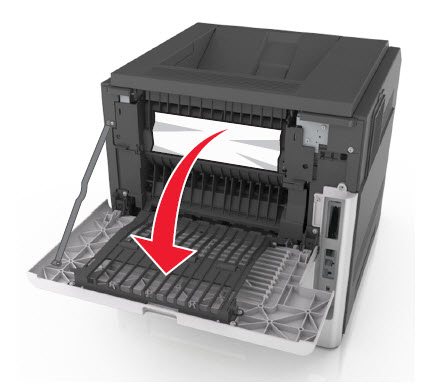
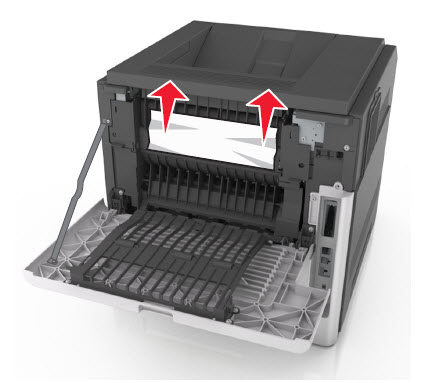
A. Look for any media that may be jammed in the fuser area and remove it.
Steps | Action |
1 | |
2 | Firmly grasp the jammed paper on each side, and then gently pull it out. |
3 | Make sure all paper fragments are removed and then close the rear door. |
B. Check the media that you are using and verify the following:
- The media is in good condition and not damaged.
- The media is stored per manufacturer’s recommendations.
- The media is supported. See the printer's User's Guide about "Supported paper sizes, types, and weights."
- The media meets all the recommendations in Lexmark’s cardstock and label guide.
- The printer is operating in a supported environment.
NOTE: If no jammed material is found and the media you are using meets the recommendations above, please contact Lexmark Technical Support for additional troubleshooting suggestions.
C. Check the consumable status.
End of life consumables such as fuser, transfer roll, and/or pick tires can cause some errors. Check the fuser's status using the printer's Control Panel . Order a maintenance kit if the fuser is already near its 'end of life' state.
Please be near the products described in this article to expedite the support process and reduce callbacks.
LEGACY ID: TE654
Audience: ‘Lexmark only’ below
Some MS71x fusers were built with a minor defect in the narrow media assembly. The defect can cause the narrow media sensor flag to stick in the down position and cause 203.01 paper jams.
Suspect range of MS71x printers with this defect:
- Manufacturing date: March 26, 2014 – October 14, 2014
- Printer serial number: 406347990HR00 – 406347990PV00
- Fuser date code: 14085 – 14286
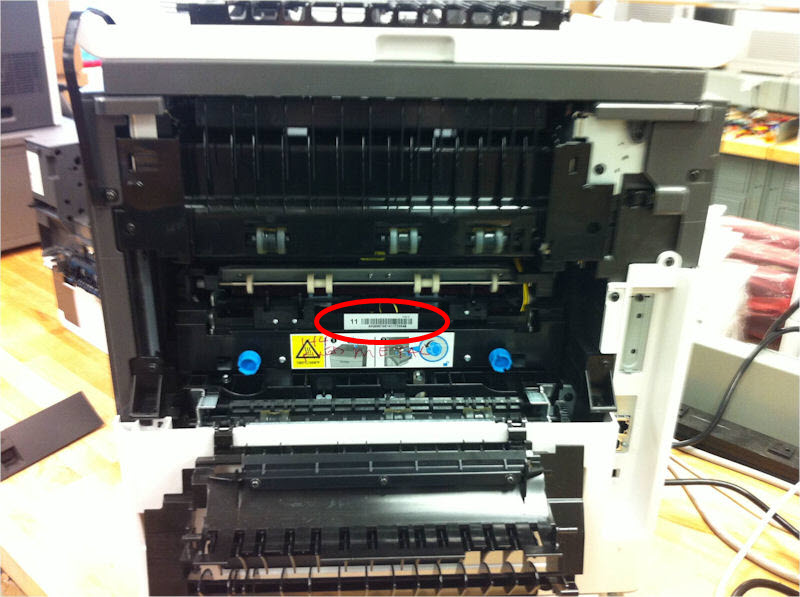
How to read fuser date code
Step | Action |
1 | |
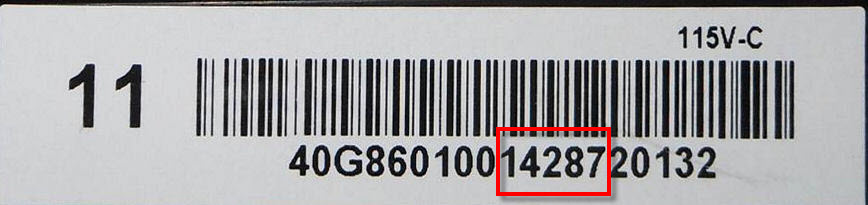
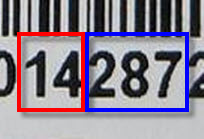
2 | The Fuser date code is the 10th to 15th digits starting from the left of the alphanumeric code. See portion of the image boxed in red. Click here to view image sample. |
3 | The 10th and 11th digits represents the year while the succeeding 3 digits represents the day of the year. In this example:
Click here to view sample image. |
NOTE: Should the fuser fall in the suspected range, send a replacement fuser using the appropriate part numbers below.
MS71x Return Program Fuser part numbers:
- 40X8503 – 110-120V (Type 11)
- 40X8504 – 220-240V (Type 13)
- 40X8505 – 100V (Type 15)
You can also guide the customer in booting the printer to Safe Mode. This will temporarily recover the device's basic printing function while waiting for the replacement parts to arrive. See "How to boot the printer to Safe Mode" in this document's Partners-level section.
Rework marking
Reworked fusers at the factory are marked with a white or silver dot above the left cover screw as shown by the image below.
Click here to view image.
Note: (A) Indicates fuser was reworked at Lexmark factory.
LEGACY ID: TE654
Technical Service Bulletin | Problem Description | |
Machine Type/Model | 4063 – xxx | 203.01 Paper Jam Error Solution Follow the recommended service action in this document. |
Date Created | 10/09/2014 | |
Last Updated | 12/16/2014 | |
Safety Issue? | No | |
Code Update? | No | |
Engineering Change? | No | |
New Parts? | No | |
Old Parts Status | n/a | |
Voltage: 120/240 | All | |
Serial No. Range | All |
Step | Action |
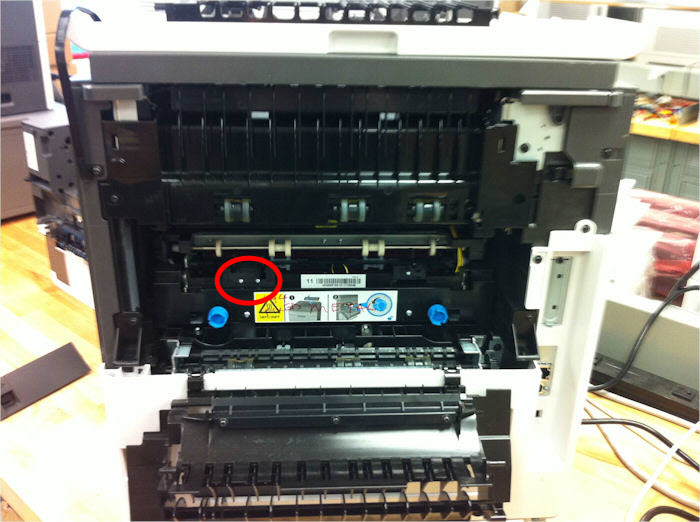
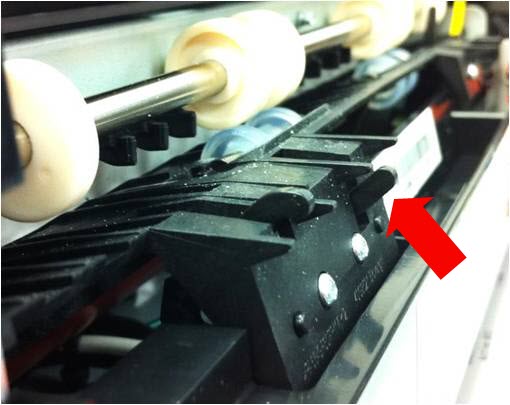
1 | Remove the rear door and lower the fuser access door to gain access to the narrow media sensor (encircled in red). See image here. |
2 | |
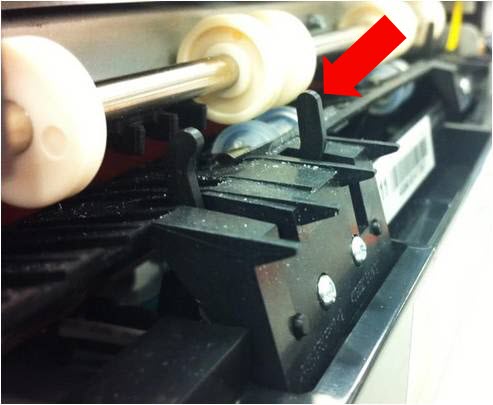
3 | The sensor should return freely such as shown in Image 3a. If the sensor is visibly damaged, returns slowly, or fails to return, such as shown in Image 3b, replace the Fuser assembly.
Note:End of life consumables such as fuser, transfer roll, and/or pick tires can cause some errors. Check the fuser's status using the printer's Control Panel . The customer will have to order a maintenance kit if a fuser enters a 'beyond life' state within the printer's warranty period. |
4 | If no fuser is immediately available while you are on site, you can either:
|
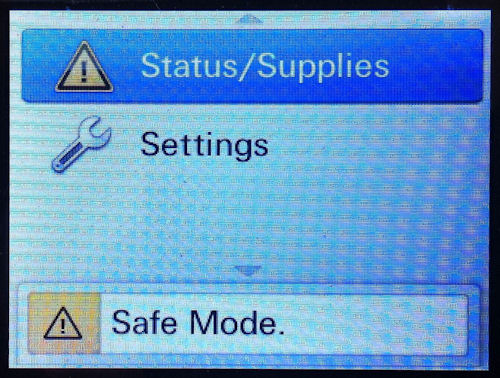
Access the printer’s Configuration Menu by pressing and holding the buttons 2 and 6 while powering it on.
On the configuration menu, navigate to “Safe Mode” and then select “On.”
Select “Exit Config Menu.” See sample image here..
- Safe Mode will help allow basic printing function with limitations such as limited speed and simplex only.
- Remember to turn Safe Mode back OFF when the fuser is replaced in order to restore full printing functionality.
Rate this article
We appreciate your feedback. We use it to identify content which needs to be updated for accuracy or usefulness.
Thank you for your feedback!